This tutorial is intended to explain the means by which you can stick your face (or someone else's) onto a player skin for the game Medal of Honor: Allied Assault. It is, obviously, not the only way in which this may be accomplished, but it's the method that works pretty well for me.
Materials needed:
The examples in this tutorial will be done using The GIMP, so if you're using different software (such as Photoshop), be aware that the terminology might be slightly different, but the actions should be pretty much the same.
Many of the example images in this tutorial are smaller than actual size; when this is the
case, there will be a small black-and-red graphic
(![]() ) in
the upper left-hand corner, indicating that you may click on the image for the
full-sized version. Such images will open in a new window.
) in
the upper left-hand corner, indicating that you may click on the image for the
full-sized version. Such images will open in a new window.

First, you need to take at least two pictures of your subject's head. You will need a front view, and at least one profile. If your subject's head is fairly symmetrical, you can get away with using just the left side of his face. If it's not symmetrical (for example, if he parts his hair on the side), it'll be easier on you if you take both left and right profiles.
Take the pictures in good lighting, without using flash. Direct sunlight, with the sun high in the sky, is good for giving the face some depth when the skin is applied; indirect sunlight or indoor lighting can make the skin look flat. Take the pictures with the subject's eyes closed, if male (the only female head in MOH:AA is skinned with the eyes open; the male heads are skinned with the eyes closed. This is why the Manon skin doesn't blink). Have the subject maintain a neutral expression (no squinting, frowning or smiling), with the mouth closed. If your subject has shiny or oily skin, have him wash his face to reduce the shine.
You'll get better results if you take the picture from further away, using a long lens or a zoom to fill the frame with the subject's head (this will reduce fisheye distortion which can occur if you're close to the subject while taking the picture). If your camera can switch between automatic and manual exposure, set it to manual, so the colors will be the same between pictures. If you have only an automatic exposure, any differences in tint can be altered later.
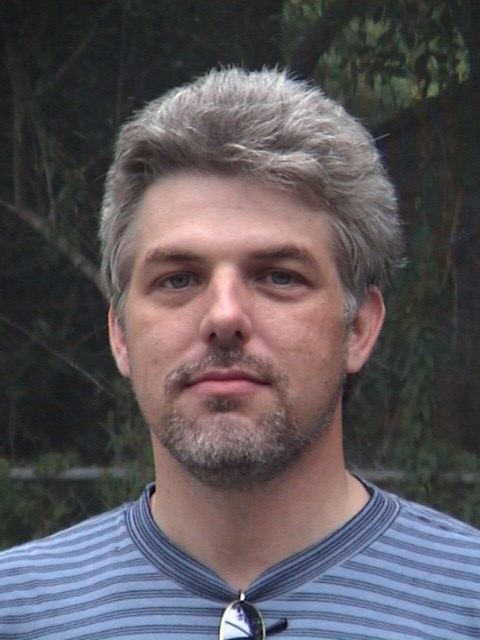
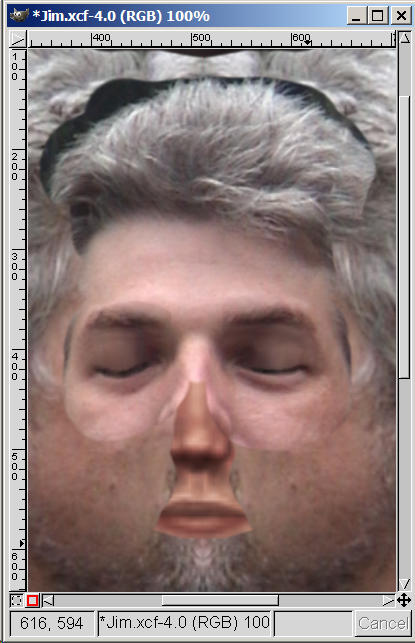
Transfer your pictures into your computer, using whatever method you have available (memory stick, firewire port, scanner, etc.) The example images at the right are my friend Jim, who graciously consented to be used as the guinea pig for this tutorial. You'll notice that his eyes are open; I took the pictures for a Deus Ex skin, so we'll have to fix that with The GIMP.
First, we need to find an existing facial skin to use as a template. Unpack one of the skins from its .pk3 file in the mohaa/main directory. For this tutorial, we'll be using textures/models/human/faces/us_j.tga from Pak2.pk3. It doesn't really matter which face you choose, as they're all set up to the same proportions (except for the female Manon head).
The .pk3 files used in MOH:AA are merely renamed .zip files. If your zip utility permits you to open .pk3 files directly, simply extract the files in the most convenient method possible. If not, you may have to temporarily rename the .pk3 file to a .zip extension, but don't forget to rename it back once you're done extracting the files!
Once you've got that file extracted, load it into your image-editing package. Rescale the image to 1024x1024 (its original size is 256x256). Do this by right-clicking on the image, and select "Image" on the menu that pops up, then "Scale Image" on the flyout menu. Enter "1024" in the New Width: box. Tab into the Height: box; it should be automatically updated to 1024; if not, change its value. Click OK.
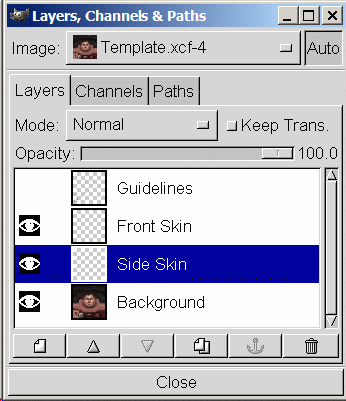
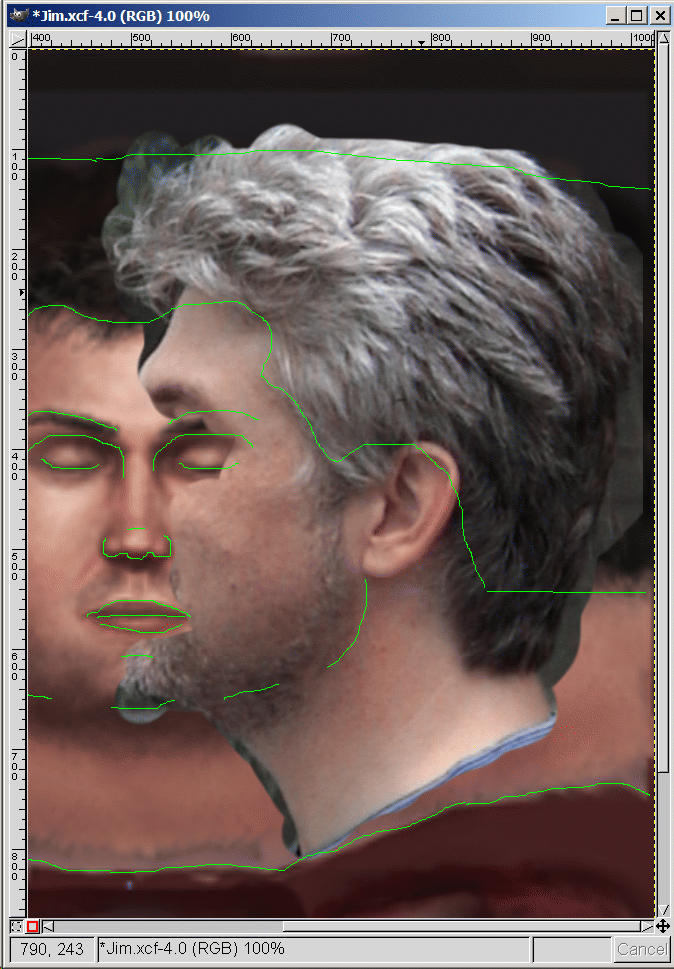
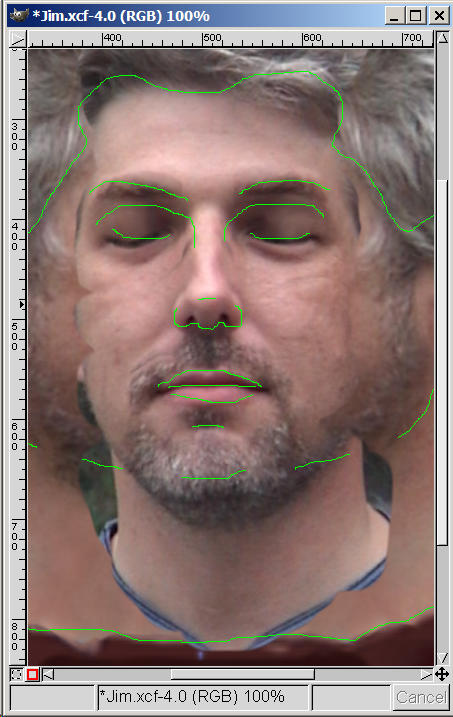
Now create three blank, transparent layers on top of the existing layer. With the image window selected, type Ctrl-L to display the Layers, Channels & Paths dialog box. Make sure the Layers tab is selected, and click three times on the "new layer" icon (a blank page, in the lower left corner of the dialog box). Make sure all three layers are transparent, and name them (from bottom up) "Side Skin", "Front Skin" and "Guidelines". Refer to the image at the right if this is unclear.
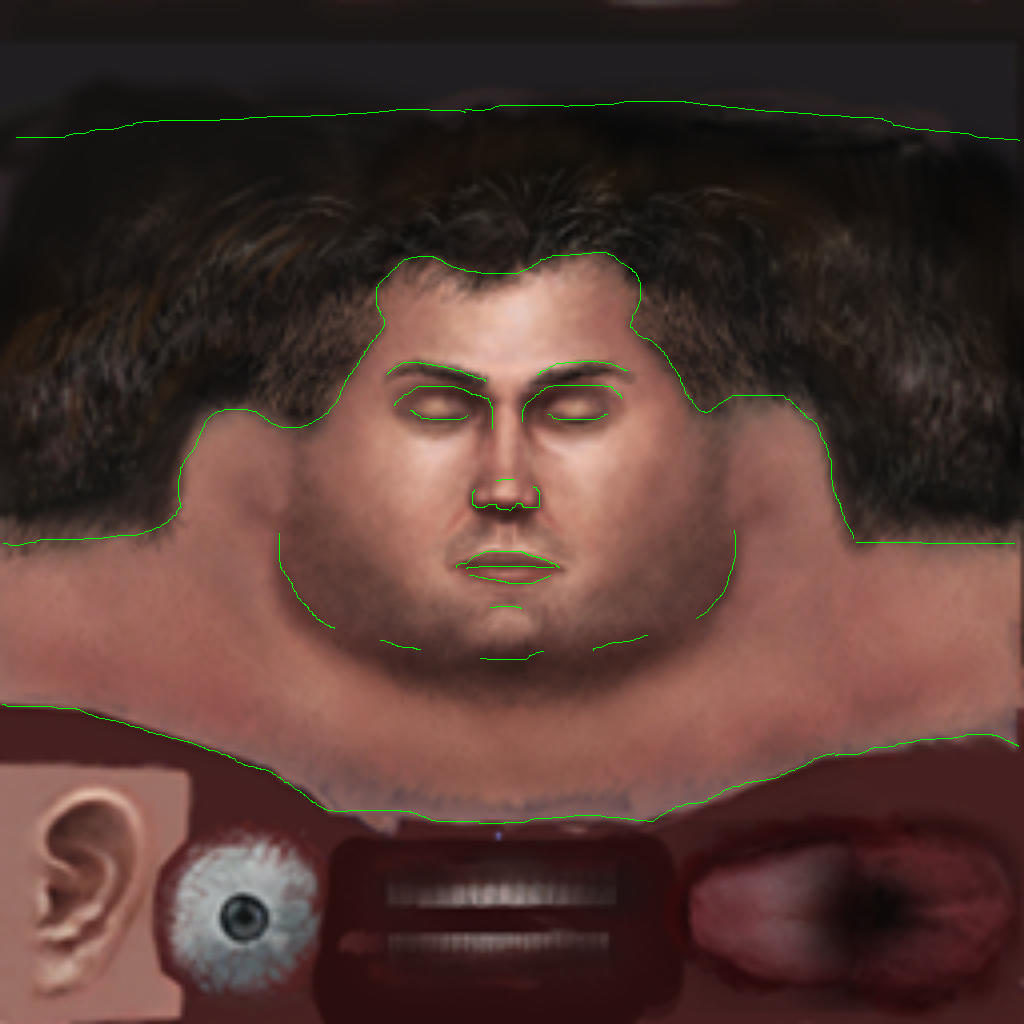
Now select the Guidelines layer. Set your brush to one pixel wide, select a color that will be easily visible (such as bright green), and use the Pencil tool to draw the outlines of the major facial features: the eyebrows, the upper curve of the eye sockets, the eyelash line, the lower edge of the nose, the lips, the outline of the jaw, the top of the chin, and the hairline. You should also draw lines at the top of the head, and the base of the neck.
Don't worry about the outlines of the ear, eye, teeth or tongue, displayed underneath the head's main skin. With the possible exception of the iris, those won't be changed much.
When you're done with that, save your file (right-click, File, Save As...). Since all of the male heads seem to use the same proportions, you can use this as a template upon which to base all subsequent facial skins. I call mine Template.xcf (.xcf being the extension of a GIMP native file; obviously, if you're using a different image editor, use whatever its default extension is).
Now save it again with a different name, so that you don't mess up the original template file. Since this is a skin for my friend Jim, I'll call it "JimFace.xcf". And now we're ready to actually make it look like him.
The first thing to do is to select the Side Skin layer. This is important, because if you leave it on Guidelines, you'll obliterate the lines as you work. Once you've got the correct layer selected, open up the image of your subject's profile.
Unless you're very lucky, the photo will be at a different scale than your skin image. This is very easy to fix: select the measuring tool. In The GIMP's toolbar, it looks like the image to the right. Now measure from the center hairline to the chin line on your skin image (I get a value of 386 pixels). Next, measure the same distance on the image of your subject (I get about 236 pixels). Calculate the value of the skin's distance divided by the photo's distance (in this case, I get 1.635593220338983). Scale the photo by that amount.
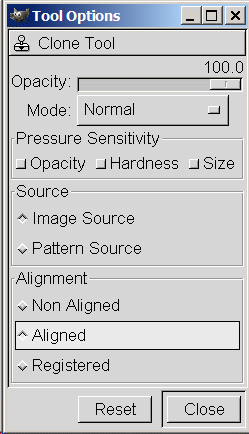
Select the "clone" or "rubber stamp" tool. Call up the tool's options dialog (under The GIMP, simply double-click the tool's icon on the toolbar), and make sure the opacity is set to 100% (fully opaque), it's using an image for the source, and it's set to "Aligned" (which is to say, if you're cloning an area, release the mouse button and start cloning again, the clone origin point won't snap back to where you originally started the operation).
Set your brush to a fairly large size. For this operation, I use a circular brush with a radius of 27.5 and a hardness of 0.4. (It looks like this in The GIMP's brush editor.)
Select a point to begin the cloning operation. I generally start at the temples, about an inch above the eye. Pick the cloning source point on the photograph (in The GIMP, you would control-click on the point where you want to begin), and then click on the equivalent point on the skin image. Clone out in every direction as far as you can, stopping if you've crossed a green line on the top or bottom, or if you've run out of head on the photograph. On the left edge, bring the cloning in as close as you can to the features, but only extend the cloning to the centerline of the face (enlarge the image at the left for an example).
As you can see, there's a bit of space at the right edge of the head which doesn't have the photograph cloned onto it. To fix it, simply clone bits from elsewhere in the hair to extend the cloning all the way to the edge.
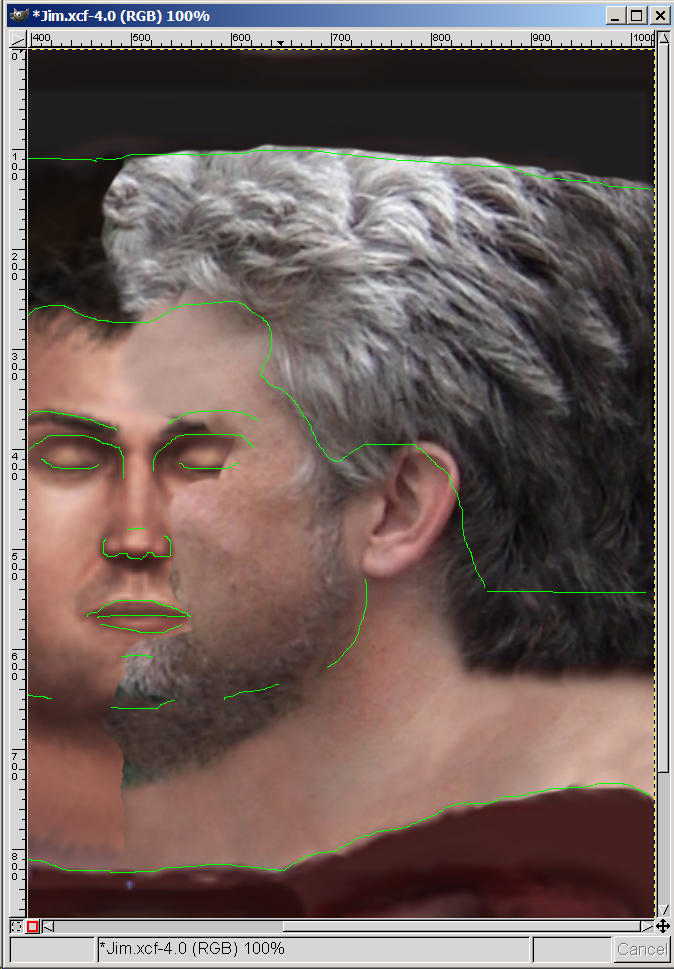
Next, we need to extend the cloning under the chin so that it reaches the centerline. This can be tricky to make look good, but it can be made a little easier by just doing a rough cloning all the way to the center, then turning the opacity of the clone tool down to somewhere between 30 and 50 percent, selecting "Non-Aligned", and then using that to blend the spots together (see image at right).
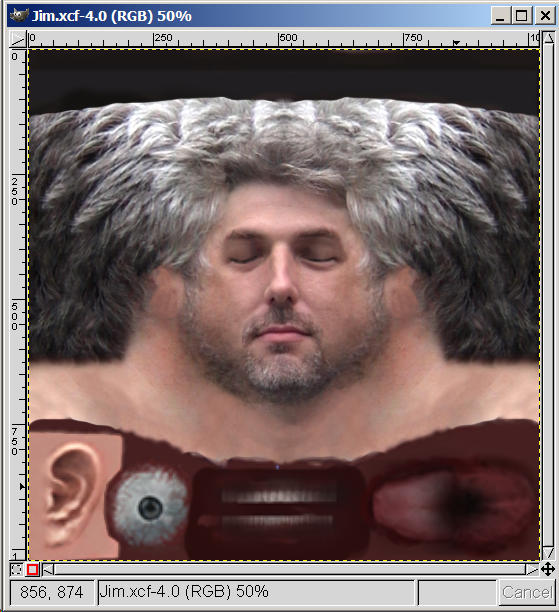
If you look at the original graphic, you'll notice that the head doesn't have ears on it; the ear is drawn in the lower left-hand corner of the skin image. Therefore, you need to use the clone tool to erase the ears. It's not really crucial to make it look perfect here, as the ear geometry will be covering up most of this area.
If your subject's head is noticeably asymmetrical, you would now repeat this entire operation for the right side of his face (the left side as you look at it). If the head is reasonably symmetrical, we can just copy the part we've already done, paste it, flip it, and move it to the other side of the head.
And now for the hard part.
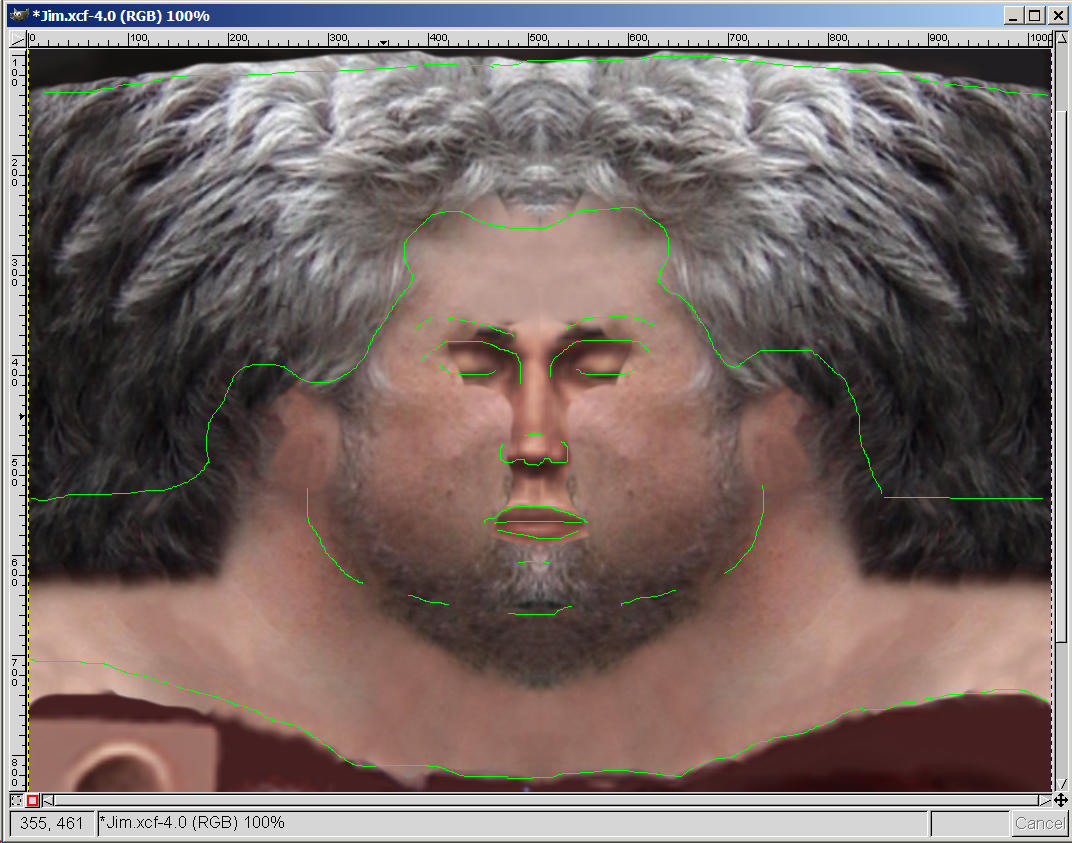
Most people's faces won't have the same proportions as the one we're using. Therefore, what we'll have to do is to copy the significant bits, and fill in the parts between them later. I always start with the eyes.
Open up the front-view image of your subject's face. Once again, the scale probably won't be the same, so do the measure-divide-scale trick we did earlier. Select the Front Skin layer on your skin image, and select the clone tool again. Make sure it's set to 100% opacity, and using an aligned copy. Now control-click in the center of your subject's right eyelashes on the photo, and copy it over to the skin. If your subject has his eyes open, as mine does, then click in the center of the lower lashes.
Clone around the eye, too — going a little above the eyebrow, sideways until you start to see hair appearing, and down onto the cheek. Then repeat the operation on the other eye.
Unfortunately, Jim's eyes are open, and we need them to be closed. So I'm just going to use a little cloning and a little smudging to rectify this problem. I can also see that the tops of his eyebrows don't quite meet the lines for the eyebrows, so I'll use the cloning tool to raise them just a touch.
Now we'll do the bridge of the nose. Start right between the eyes, and go upwards and downwards until we start seeing other features we don't want. In Jim's case, his nose is shorter than our templates, so we'll stop there. Above the eyes, you can start filling in to the left and right, and go up into the hair. Don't worry if you create a visible seam in the hair or above the eyes; we'll fix that later.
Next, start at the bottom of the nose and work your way upwards until it meets the part you've already done. Extend out the cheeks about the same amount as they went next to the eyes, but only go about halfway down the filtrum (the little "scoop" between the nose and the lips). Once you've done that, clone the lips, starting from the exact middle. If the face will permit it, go all the way down past the chin to the bottom of the neck; if it won't, then do a separate copy from the chin line.
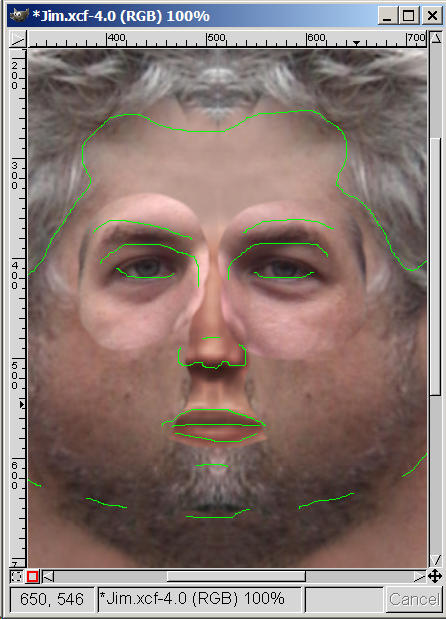
Select the eraser tool, and choose a brush that's fairly small (about 19x19, circular) and has fuzzy edges. Use this to remove bits around the front that shouldn't be there, such as the background next to the neck and hair, the collar, and the temple/sideburn hair. You can turn off the visibility of the Guidelines layer, as we won't be needing it from here on out.
Because I used a camera with automatic exposure, the front layer is a little brighter than the side layer. I can either darken the front, or lighten the side; I think I'll lighten the side, so I'll select the side layer and bring up the Color Levels dialog box. In The GIMP, you can do this by right-clicking on the image, and selecting Image->Colors->Levels.... Fortunately, the tint is pretty similar, so in this case I only need to manipulate the Value channel, and bring the maximum input level down to about 225.
There are a few places on the Front Skin layer where the multiple cloning operations left seams or duplicated parts. So using the Smudge and Clone tools, we'll just take those out, resulting in the image at the right.
Select a relatively small, circular brush with fuzzy edges. Select the eraser tool and set its opacity to around 60%, make sure hard edges are turned off, and go around the edges of the front layer, everywhere the skin or hair is noticeably lighter or darker than the side layer. Don't go too far inwards, because then you will set the eraser's opacity down to about 30%, and go around the edges, a little closer in, until you've got a nice smooth blend between the front and side layers.
If the ear color is noticeably different from the face's, move to the Background layer, and select the ear using whatever tool you find handy (lasso, magic wand, etc.) and adjust the color levels until it matches the face. Likewise, if your subject's eye color isn't the same as the one in the image you used as a background, select the iris and use the HSV dialog to change it to the color you wish.
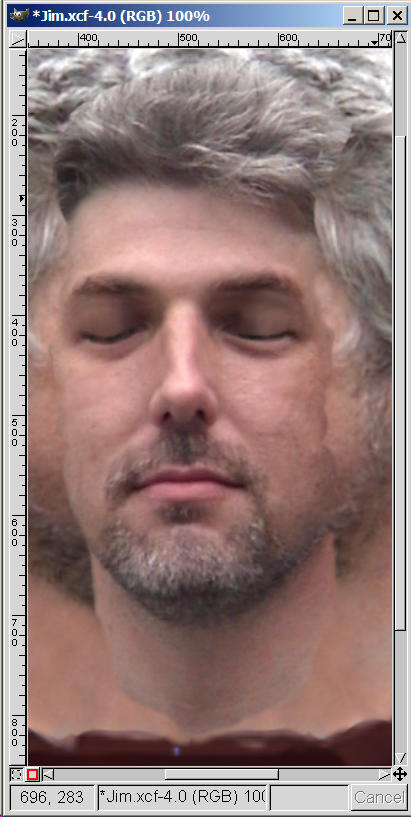
Here's what I ended up with (half-sized):
Now we need to put it into a format MOH:AA will recognize. Save your file as it is! Now flatten the image (make sure the Guidelines layer is turned off), and set the scale to 0.25 (25%, giving a final image size of 256x256). Now save it as either a Targa file or a JPEG. A Targa file is larger, but a JPEG can look blocky and smear certain colors unless you know a trick to avoid it.
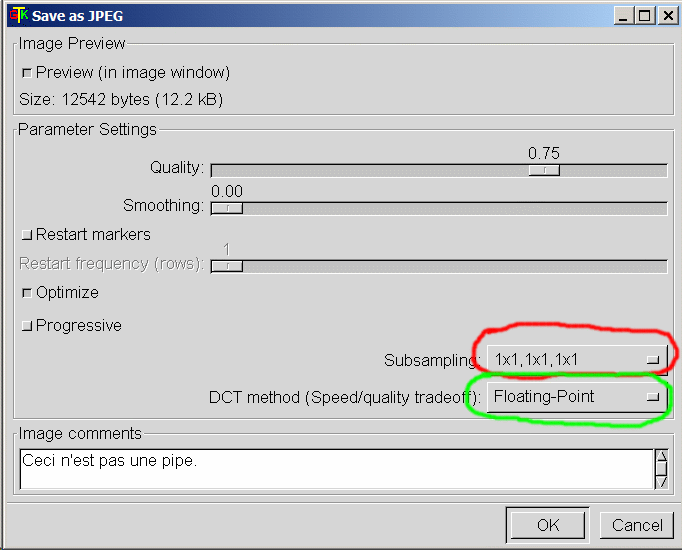
And here is the trick: when you save a JPEG image with The GIMP, it pops up a dialog which permits you to control various JPEG features. The ones we're interested in are the subsampling method (circled in red) and the DCT method (circled in green). Setting the subsampling method to 1x1, 1x1, 1x1 will greatly reduce the blockiness and color smearing, and setting the DCT method to Floating-Point will make it look a little bit better, as well. You could also move the Quality slider up from its default value of 75%; even if you set the quality to 100%, the resulting JPEG file will still be less than a third the size of a Targa file, and practically indistinguishable from it.
I suggest saving your file as a JPEG, because if you ever want to alter it, you can work from the 1024x1024 original, rather than enlarging the JPEG and re-encoding it (which will have a negative impact on the image quality). And your skin files will be much smaller, which is always a good thing.
Different people have different head shapes, so we're fortunate in that MOH:AA has a number of different heads to choose from (unless you're creating a female skin, in which case you're stuck with the Manon model). The way I choose the head to use is a little tedious, but you really can't tell what the final product will look like until you've seen it.
Pick a body to put this face on. For this example, I'll use the "allied_SAS" model, because it doesn't have a hat or a helmet, and we'll be able to see the whole head (we could actually comment out the hat while we're testing, but let's make this as simple as possible for now).
Extract the model files from the .pk3 (in this case, Pak0.pk3 holds both models/player/allied_SAS.tik and models/player/allied_SAS_fps.tik. If the directory doesn't already exist, create a models/player subdirectory underneath your mohaa/main directory. While you're at it, create a scripts and textures/models/human/faces. Place the Targa or JPEG file you just created (in my case, JimFace.jpg) into the textures/models/human/faces subdirectory, and both of the allied_SAS*.tik files into models/player.
Go into the scripts subdirectory, and create a file named JimFace.shader containing the following text:
JimFace
{
    qer_editorimage textures/models/human/faces/JimFace.jpg
    {
        map textures/models/human/faces/JimFace.jpg
        rgbGen lightingSpherical
    }
}
Now, let's rename allied_SAS.tik and allied_SAS_fps.tik to allied_Jim.tik and allied_Jim_fps.tik, so it'll be easier to find the skin in the list (otherwise, depending on the name of the .pk3 file it's in, it'll either overwrite the SAS skin, or be overwritten by it).
We can leave allied_Jim_fps.tik alone — that just contains the arms and hands that we see when we're playing — so we need to edit the file named allied_Jim.tik. Towards the top of the file, you will see the following:
//	$include models/human/heads/us_young_heads.tik
	path models/human/heads
	skelmodel head2.skd
	surface head shader jeff_c
Change those last two lines to read:
//	$include models/human/heads/us_young_heads.tik
	path models/human/heads
	skelmodel head1.skd
	surface head shader JimFace
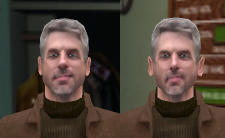
Now, to help us figure out which head to use, we're going to copy those two .tik files to axis_Jim.tik and axis_Jim_fps.tik. Open up axis_Jim.tik and change the skelmodel head1.skd to skelmodel head2.skd. Save the files, and run MOH:AA. Go into the Multiplayer options, click on the wardrobe, and select allied_jim and axis_jim. Compare their heads; which one looks more like the photograph?
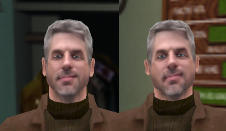

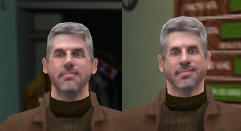
To me, head #1 (on the left) looks more like the photo. Click Apply (so we won't have to re-select the skins next time) and quit MOH:AA. Now we'll re-edit the .tik files, setting the allied model's head to #3, and the axis model's head to #4, and then run MOH:AA again to take a look at the results:
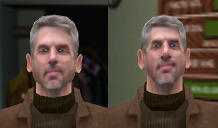
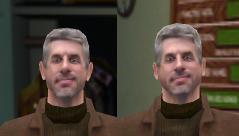
Head #3 is definitely closer (although the ears stick out a bit too much). Next, compare heads #5 and #6:

Here, it's #6 that has the edge. And now we compare heads #7 and #8:
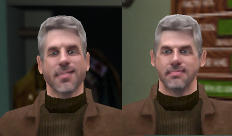
I guess #8 looks more like him in this one. Now we'll compare the semifinalists, starting with #1 and #3:
It's close, but I think #1 looks more like him; head #3 is too narrow. Now we'll look at heads #6 and #8:
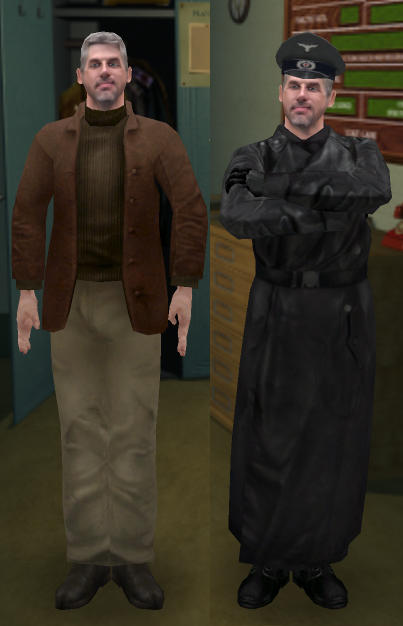
This is a tough one, but I think #6 looks just a little more like him than #8. And now we compare our two finalists, #1 and #6:
I think #6 is the winner here. So now I'll just set the head in allied_Jim.tik to #6, and create a version in German uniform, for when Jim's playing on the Axis side. Jim's a pretty stylish guy in real life, so I'll put him in the leather trenchcoat of the Panzer tank commander.
Now, for distribution, all we need to do is put the files into a .pk3 file. Being a command-line junkie from way back, I prefer to use Info-ZIP, though you can use whatever zip-capable archiving utility that you like. If your utility can't handle .pk3 files natively, you'll have to perform the operations on a normal zipfile, then rename it to .pk3 when you're done.
Opening up a DOS window, I change to the mohaa/main directory, and enter the following commands:
C:\GAMES\MOHAA\MAIN> zip -9m JimSkin.pk3 models\player\*Jim*.tik
C:\GAMES\MOHAA\MAIN> zip -9m JimSkin.pk3 scripts\JimFace.shader
C:\GAMES\MOHAA\MAIN> zip -9m JimSkin.pk3 textures\models\human\faces\JimFace.jpg
The -9m indicates that maximum compression should be used, and the files should be moved into the archive (deleting them from the directory once they've been compressed). Do a listing of the .pk3 file to make sure everything transferred properly (including the directory names):
C:\GAMES\MOHAA\MAIN> unzip -l JimSkin.pk3
Archive:  JimSkin.pk3
  Length     Date   Time    Name
 --------    ----   ----    ----
      721  12-04-01 20:15   models/player/allied_Jim_fps.tik
     1010  07-18-02 00:08   models/player/allied_Jim.tik
     1044  07-18-02 00:08   models/player/axis_Jim.tik
      735  12-04-01 20:15   models/player/axis_Jim_fps.tik
      161  07-17-02 18:26   scripts/JimFace.shader
    12539  07-17-02 18:25   textures/models/human/faces/JimFace.jpg
 --------                   -------
    16210                   6 files
Obviously, if you're using a different archiving utility, you'll probably need to follow different steps in order to place the files in the proper subdirectories within the zipfile. Refer to your utility's documentation to find out how to do this.
If you really can't figure out how to do it with a GUI zip utility, and the mere thought of using a DOS application causes you to tremble in your boots, I've created this utility which will allow you to upload the files to a Web page and get back a properly structured .pk3 file.
Et voilà! Jim's now got a set of custom player skins, which he may now easily distribute to the people he plays with; now they can see his face instead of a generic character. People without the skin will just see a regular character running around. Unfortunately, if he's playing on a "pure" server, it won't show his custom skin to the people who do have it installed, unless it's also installed on the server.
Perhaps one of these days, MOH:AA might be updated to support the automatic transfer of custom skins, but until then, this is the best we can do.
Incidentally, by using a JPEG image (with 75% quality) rather than Targa, our .pk3 file is a mere 15,169 bytes. If we'd used a Targa file instead, it would have been 142,626 bytes — so we ended up with quite a savings.
I hope you found this tutorial useful and understandable. If, after reading the FAQ, you have any comments or questions, feel free to email me.